Reading a Vernier

A Vernier allows a precise reading of some value. In the figure to the right, the Vernier moves up and down to measure a position on the Scale. This could be part of a barometer which reads atmospheric pressure.

The "pointer" is the line on the vernier labelled "0". Thus the measured position is almost exactly 756 in whatever units the scale is calibrated in.

If you look closely you will see that the distance between the divisions on the vernier are not the same as the divisions on the scale. The 0 line on the vernier lines up at 756 on the scale, but the 10 line on the vernier lines up at 765 on the scale. Thus the distance between the divisions on the vernier are 90% of the distance between the divisions on the scale.
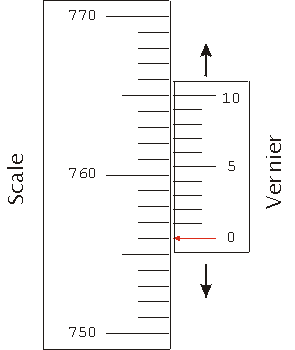
A Vernier reading almost exactly 756.0

If we do another reading with the vernier at a different position, the pointer, the line marked 0, may not line up exactly with one of the lines on the scale. Here the "pointer" lines up at approximately 756.5 on the scale.

If you look you will see that only one line on the vernier lines up exactly with one of the lines on the scale, the 5 line. This means that our first guess was correct: the reading is 756.5.
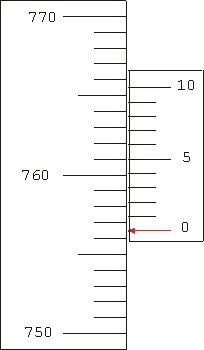
The Vernier read 756.5

Here is a final example, with the vernier at yet another position. The pointer points to a value that is obviously greater than 756.5 and also less than 757.0. Looking for divisions on the vernier that match a division on the scale, the 7 line matches fairly closely. So the reading is about 756.7.

In fact, the 7 line on the vernier appears to be a little bit above the corresponding line on the scale. The 8 line on the vernier is clearly somewhat below the corresponding line of the scale. So with sharp eyes one might report this reading as 756.73 ± 0.02.

This "reading error" of ± 0.02 is probably the correct error of precision to specify for all measurements done with this apparatus.
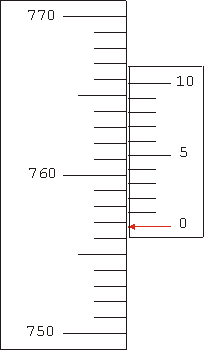
The Vernier read 756.73

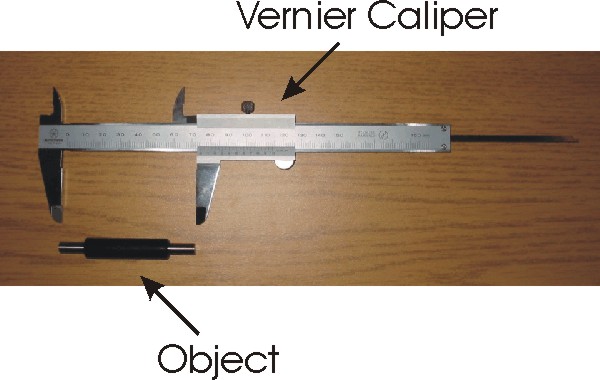
Now we shall use a simulation of a Vernier Caliper. A caliper measures a length, and in the following figure we show a caliper being used to measure the length of an Object. The Object will be placed between the "jaws" of the caliper. The Object is almost exactly 75 mm (2.95 in) long.

Vernier Caliper measuring the length of an Object

In the above photograph, you can see that on the top of the caliper are two "prongs" which can be used to measure an interior dimension. There is also a piece of metal sticking out from the right side of the caliper, which is a depth gauge.

Calipers commonly use a vernier scale. In the simulation below, you may "grab" the jaw of the caliper with the left button of the mouse and move it to some position. When you click on the Show button the distance between the jaws will be shown.

Note that there is a small difference between the simulation and a real caliper: in the simulation the distance between the jaws is always an even multiple of a tenth of a millimeter. It does not allow readings between these values, for which we would have to estimate the value.

The Java applet to simulate the vernier caliper was written by Fu-Kwan Hwang, Department of Physics, National Taiwan Normal Univ., and is used by permission. The original site of the applet is http://www.phy.ntnu.edu.tw/java/ruler/vernier.html


This document was written by David M. Harrison, Dept. of Physics, Univ. of Toronto, harrison@physics.utoronto.ca, in July 2002.
With the exception of the caliper simulation, all text and images are Copyright © 2002 David M. Harrison.

The Copyrighted material may be distributed only subject to the terms and conditions set forth in the Open Content License, v1.0 or later (the latest version is presently available at http://opencontent.org/opl.shtml).